Showing posts with label macarons. Show all posts

Thanksgiving Macaron Centerpiece: Pumpkin Spice Macarons

IMG_9372

IMG_9377

Hey all! How are your thanksgiving preparations going? did you plan your menus, finish the grocery shopping and shine the silver already or are you more of a last minute type (like me?) I have been seeing posts and tweets about turkey thawing, and pie-crust rolling and I can't help getting caught up in the excitement. I always miss my large family during holiday season and wish there were more of us on the West Coast. But I can't complain too much since I was blessed to see my awesome cousins recently and had my mom-in-law visiting us until last week. So this year Thanksgiving looks to be a small affair with my little family and plans to meet a couple of friends after which we three are heading off for a short trip. It didn't seem natural to not do any cooking or baking though, so here is a thanks giving center piece idea: Pumpkin Spice Chocolate Macarons! 

Making these and piling them into glass jars or stacking them on cake stands along with little pumpkins, squash, pine cones and autumn leaves seemed like a good idea to add some festive cheer to your table. They would make great hostess gifts too I'm thinking :)

I haven't made macarons in a while and recently a couple of friends were discussing them and I felt that familiar itch to bake them all over again. Looks like my macobsession is back eeeeeks! These pint sized treats are perfect to nibble on while waiting for the caramel cardamom pumpkin pie or swirly pumpkin-ginger  cheesecake to be served. Another interesting fall macaron idea is this Ginger Spice Macaron

Oh and I discovered that you don't need cream to make ganache. Ok so I forgot to buy cream. But the important thing  is- you don't need it! Make ganache with chocolate and ...milk! You can thank me now and Nigella who apparently knew too. 

macarons2 macarons3 macarons4

IMG_9350

Macaron Ice cream sandwiches


Macarons = awesome, Ice cream = awesome
Macarons + icecream =  Infiniteawesomeness!!

The inspiration for these delicious ice cream filled macarons came from my trip to Columbus this Christmas. No, it wasn't the freezing cold or the thick white snow, but a much less abtract source, my favourite ice cream

Baileys Macaron Cocktails- Mactails!


Winter is the time for boozy desserts and while I am not a huge fan of the rum soaked fruit cake, I do like a little liqueur in my desserts. Remember my recent cocktail cupcake fascination? Lately I have been playing around with the idea of  Macarons flavored with sweet dessert wine, Tequila, Grand Mariner, Chocolate Liqueurs .. to create macaron margaritas, macaron mojitos and other mactails! Many, many possibilities!

Ginger Spice Macarons

Take a look at my swirly pumpkin cheesecake from the previous post. Isn't she lovely? For the batter I had to beat cream cheese with nutmeg and crystallized ginger and as I was polishing away ahem taste testing this I thought - this would make an incredibly awesome macaron filling. And I was right! So here is my discovery- that I just couldn't wait to share with you all- delicious cream cheese ginger spice filled macarons! 
Unfortunately I ran out of cream cheese and time to fill the rest of my macarons, which are as you can see shamefully lacking feet. But feet or no feet I still think macs taste awesome. This time I used Helene's recipe on the recommendation of the very talented foodieblogger Ria who I had the good fortune to meet for a short bit last week during her visit to California. ( More on that and her awesome almond cookies later when she posts the recipe- they were really good and are definitely worth waiting for!)
First check these out!

While my first batch had no feet at all, for the second batch, I lowered the oven temperature to 275 and also placed two large cake tins directly underneath my cookie sheet ( tripling the cookie tray would be what I was trying to achieve but unfortunately I only own one non-heavy duty professional baker type cookie sheet) This seemed to help and looking in the oven window I saw this:


Could they be? Yes they are! Glorious little  ruffles on the underside of my macs! Those longed for, tiny little feet! However in my excitement I opened the oven door too soon so these had cracked, undercooked shells that gave me a broken heart :(  Never mind I have 6 egg whites aging on my counter waiting for my next macattempt! I will definitely be trying Helene's recipe again.


Ginger Spice Macarons

For my awesome Ginger Spice cream cheese filling:
Ingredients:
  • Cream cheese- 8 ounces softened ( I used one block of the Philadelphia brand) 
  • Sugar: 1/4 cup or more depending on sweet tooth
  • Nutmeg powder: 1/4 tsp
  • Crystallized ginger: 1/4 cup ( shredded in your food processor) 
Method:
In your food processor or using a stick blender ( Like I did) shred the ginger along with the sugar. Now add the cream cheese and nutmed and blend until smooth and combined.
Let it harden in the fridge for about 30 mins and then spoon or pipe onto your macaron and sandwich with another macaron shell.

For the shells:
Recipe Source: Adapted from Helene from her blog Tartlettle here as well as notes from her classes kindly shared by bellalimento from here

Ingredients:
90 gr egg whites (roughly 3 egg whites)
25 gr to 50gr (2 Tb to 1/4 cup) granulated sugar
200 gr ( 1.5 cups + 2Tb) powdered sugar
110 gr almonds ( 3/4 cup) (slivered, blanched, sliced, whatever you like)
Method:
Separate the whites from the yolks and place the whites in a lean bowl 48 hrs or atleast 24 hours before you make the macarons. Leave the whites at room temp, uncovered or loosely covered with a towel at least 24 hrs. Refrigerate after that if desired. You can use eggs that have been “aging” for up to 5 days. This helps the water to evaporate and is important for the right texture and for achieving those feet. Am sure you can skip this step if you arent aiming for perfection. They taste about the same. Also don't worry about old egg whites killing you. The germies get killed at the temperatures were going to bake them at. 
If you are still queasy or just in a hurry you can skip the aging and microwave the egg whites for two short 10 second periods, stirring in between each period. Careful! don't overdo this and cook the eggs! if you do please start over with fresh eggs and reducing the time. 
Prepare the macarons:
Place the powdered sugar and almonds in a food processor and give them a good pulse until the nuts are finely ground. Sift a couple of time to remove bits and pieces. Regrind if necessary. You can also use a coffee grinder for the nuts or you could use store bought almond meal like I did from Trader Joes. But don't forget to sift, sift and sift again.
Once your nuts and powdered sugar are mixed together, rub them in between your fingertips to break the bigger pieces.
In a stand mixer fitted with the whisk attachment, whip the egg whites to a foam, (think bubble bath foam) gradually add the granulated sugar until you obtain a glossy meringue (think shaving cream). Do not overbeat your meringue or it will be too dry.
Add the nuts and powdered sugar to the meringue, give it a quick fold to break some of the air and then fold the mass carefully until you obtain a batter that falls back on itself after counting to 10. Give quick strokes at first to break the mass and slow down. The whole process should not take more than 50 strokes. Test a small amount on a plate: if the tops flattens on its own you are good to go. If there is a small beak, give the batter a couple of turns. If you overfold the batter will become too runny so be very careful.
Fill a pastry bag fitted with a plain tip (Ateco #807 or #809) with the batter and pipe small rounds (1.5 inches in diameter) onto parchment paper or silicone mats lined baking sheets.I used my spritz cookie gun instead with the icing tips which I personally find easier to use rather than the frustrating double-ended pastry bag. I also found this macaron template/stencil very useful- just print it out, slide it under your baking sheet, pipe out the macarons and then remember to slide it out and remove before putting them in the oven, else you'll have a nice flame.
Now lift the tray up and gently let fall, so that the underside of the tray hits your kitchen counter, to let air bubbles escape. No, I don't want you to throw macaron batter all over your kitchen :P
Let the macarons sit out for 30 minutes to an hour to harden their shells a bit. 
If using convection: preheat the oven to 280F. If using regular electric or gas, preheat the oven to 300F ( I reduced to 275F) . When ready, bake for 18 to 20 minutes, depending on their size. Let cool.
Am sending my delicious fall inspired macarons to this months Macattack at the mactweets blog hosted by the awesome Deeba and Jamie.


For more macaron tips see my post with tips from my macaron classes
Obsessed much? want more? Here is a very useful document from Helene of Tartlette's feature on macarons in Dessert Magazine which she's linked on her awesome blog

Chocolate Nutella Macarons


It's been a while since my macaron making classes and I have been dying to try making them all by my self at home. I just assumed that since we made such beauties at the class, making them at home would be a breeze as well. How wrong I was!
First I had trouble finding almond meal so I ground up some almonds in my blender and had some delicious flat free form almond cookies, but no macarons since grinding nuts makes them oily and hence makes the batter too liquid-y. Note: if you are grinding the almonds yourself, check frequently to ensure you don't grind them so much they start releasing oils.
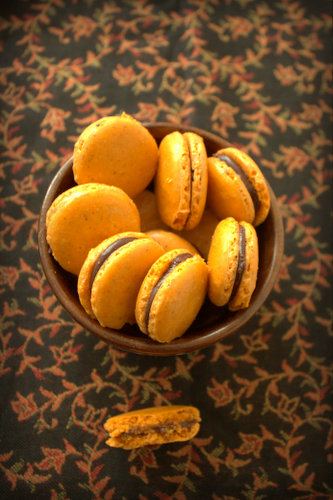
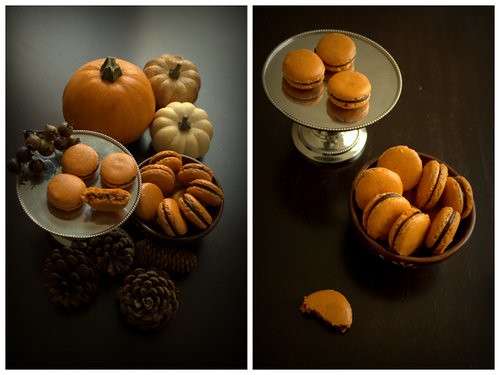
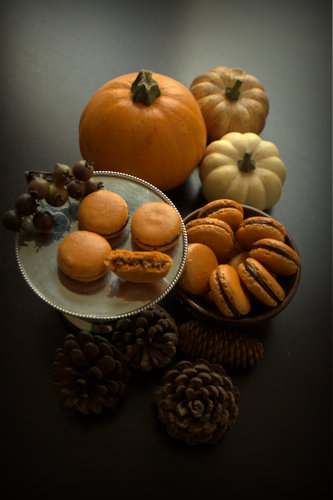
After T finally found almond meal at our local Trader Joe's (They are in the nut section in case you're looking-not in the baking section and ask for almond meal and not almond flour!)  I set about aging the eggwhites for a long 24 hours on my kitchen counter and had just a little more success. They weren't smooth and shiny on top, nor did they have the characteristic ruffle-like underside "feet", and they do look more like whoopie pies than macarons but sandwiched with a dollop of Nutella, they were delicious. ( Nutella makes anything better :) I think not sifting the rather coarse almond meal enough caused my downfall. Maybe I should have pulsed it in the food processor to make it finer.
Macaron pundits may have also raised an eyebrow when I eschewed the pastry bag in favour of a spritz cookie gun fitted with the icing tip. I had a mess last time after my overfull pastry bag started leaking from the other end and I must say I think the cookie gun is way easier to handle-using my free hand to guide the gun, making sure I was holding it at 90 degrees.
I used Namthip's recipe from class. It is very similar to the one posted on her site except halved.

Chocolate Macarons
Recipe source: Namthip of Bonbini

Ingredients:
Makes 80 shells (I halved the recipe)

For the shell

  • 140 g almond flour
  • 10 g cocoa powder, Dutch-processed 
  • 200 g powdered sugar
  • 45 g egg whites, aged
  • 30 g sugar
  • 55 g egg whites, aged

Method for the shell
1. Preheat the oven to 350 degrees.
2. Sift almond flour, cocoa powder and powdered sugar together in a big bowl, discard the solids.
(If the almond flour or meal is too coarse, pulse in your food processor until fine and powdery- but careful! don't over grind or you'll make it oily)
3. Create “Mass” by folding almond flour, cocoa powder, powdered sugar and 45 g of egg whites together with a big spoon. The mass will look lumpy. That's ok
4. To make French meringue: whip egg whites in a mixer on medium speed to soft peaks. Slowly pour sugar in three additions, continue whipping to medium peaks. Basically the peak should stand up at 90 degrees. Another way to test us to carefully turn the bowl upside down. If the whites stay in the bowl without falling out that mean's they're done.
5. Fold in 25% of meringue into “Mass” to lighten the mixture.
6. Fold in the rest of meringue carefully in circular motions, cutting the batter to incorporate the whites well, until the batter has a "magma' like consistency- basically if you put a drop of the batter on a plate, it should sink into itself and not have a peak. If it has a peak, fold a little more. Don't overfold or it'll be too runny.
7. Place into a piping bag with plain tip # 3, pipe 1" diameter circles on sheet pan lined with a silicone baking mat or parchment paper. ( I used a spritz cookie gun fitted with the icing tip since I haven't quite mastered double ended squirty icing bags)
8. Rap the tray on the counter to get rid of air bubbles.Rest for an hour to form skins.
9. Place another baking tray under the tray with the batter (doubling the tray-this helps to ensure the underside of the macs don't get overbaked) Lower the oven temperature to 320 degrees, bake for 10-12 minutes, rotating the trays half way through.
10. Let them cool on a silicone baking mat, then remove and sandwich them with the filling.
( If you are having trouble removing the parchment paper from the tray, keep it in the freezer for a few mins and then you should be able to peel the parchment paper off easily)


I was thinking of making a Nutella ganache but then decided I couldn't wait so just spooned a dab of Nutella and sandwiched my macs. Although this kind of overpowered the delicate flavour of the almond flour shells, I can't say I regret it. Who can resist the chocolate-hazelnut combination and creamy texture of Nutella?It's a firm favourite right through from childhood. We didn't bother to spread it on anything but licked spoonfuls with sheer delight. Well not much has changed! I have been wanting to make a Nutella filled macaron for ages. I would like to try a hazelnut macaron the next time though, after I have had a little more success with the basic recipe!

Although a failure, I'm sending my feetless, pockmarked macs to this month's Macattack hosted by the amazing Deeba and Jamie at the Mactweets blog.

Mad about macarons? Meet others who are obsessed and hear what they have to say about Technique and Macronnage and those blasted feet!

Helen's inspiring recipes
David Lebowitz's recipes and links for further reading
Coco's tips and pics
Duncan's exhaustive notes and step by step photos
Meeta's quick notes and tips
Deeba's macaron adventures

Step by step photos from my macaron making class with tips!


For some time now the blogosphere has been abuzz with talk of feet, aging egg whites and perfect shells. Everyone seems to have been bitten  by the macaron bug- "the dessert sensation that swept the nation and indeed the world". 
I got a chance to share in the macaron madness before it disappears for good- and that would be a pity for with a crunchy exterior and chewy interior filled with ganaches and creams these delicate delights that come in a myriad flavour combinations are definitely worthy of all the fuss surrounding them.
There are many stories about the origin of the macaron (Not to be confused by the coconutty macaroons) my favourite is the story of two nuns seeking asylum during the French revolution, who baked and sold macarons to support themselves. Today almost every bakery worth it's sugar from Delhi to Dallas stocks macarons (priced here at about $2 a pop)
If I could make a trip to Paris just to taste the macarons at Laudree I would.
Meanwhile I'll just bake them myself! I got signed on to  macaron making class as a birthday present from T and am sharing with you some tips I learnt to conquer these moody creatures. Let me warn you though! They are addictive!
If you are interested in the classes or the recipe you can contact the wonderful Namthip of Bonbini. Under her guidance all of us who attended the class including one self professed cake-mix fan turned out dainty little macarons, with perfect feet - the elusive almost ruffle-like looking underside of the macaron.
We made chocolate, matcha green tea, coffee and raspberry shells and also learnt how to make coffee chocolate ganache, raspberry, matcha green tea, raspberry and banana ganache.


For the Macaron Recipe:

Since the class I have made several batches and the recipe that I have found most success with is this one from Helene of mytartlette.com  so you can check her site out for the recipe, but below are the critical steps to follow:

Step 1: 
The key to good macarons with the ruffle like underside is to use aged egg whites. The reason is that aging them reduces the moisture in them and also breaks up the protein strands. You can age them by leaving the egg whites in a clean bowl on the counter for atleast 24 hours or covered in the fridge for up to 5 days. Else if you are in a hurry, simply microwave them for 10 seconds at a time dipping your finger to check that the thick texture of the whites has become more liquidy. Careful! Don't cook them! two short 10 second bursts in the microwave should do. 


Almond meal ( powdered almonds) is available here in the US in several stores including Trader Joe's ( best price) or online from Bob's Red Mill Else you can grind blanched almonds ( without the skin) in your foodprocessor/ mixie along with the sugar until powdery but careful, not too much or else it will become oily and wet and not suitable for macaron making. 


Also make sure you use powder ( confectioner's ) sugar which contains corn starch. If using granulated sugar, make sure you use this method to substitute:


For 1 cup powdered sugar: Measure 1 cup granulated sugar. Add 2 tbsp corn starch. Pulse in grinder until fine and powdery. Do not use straight granulated sugar in place of powdered sugar. You will get a grainer texture. Plus the cornstarch helps to manage the moisture and without it, your macarons will flop.

Yyou can also grind your store bought almond meal along with the icing sugar quickly for about two 30 second pulses to ensure that the almond meal is fine and so you get smooth tops. Also sift, sift sift! 


Step 2:

Mixing the dry ingredients with a little egg white, holding on to the mixing bowl and rotating a wooden spoon until it just starts to come together. It's OK if its a little lumpy at this stage. ( The photo below is for a chocolate macaron which is why it is such a dark brown- if trying for the first time, use a plain macaron recipe) Note this step is optional many recipes do not call for it and I have recently stopped doing it too. 


Step 3:
Whipping the egg whites to stiff peaks that stand up at 90 degrees.


Step 4:
Folding whipped egg whites into the dry mass, very carefully in circular motions, splitting the mass and rotating in different directions to ensure the whites are well incorporated and mixture is not streaky. Careful! don't deflate the mixture or over mix! You just want the mixture to be able to move slightly, not be too runny, or else it's done for! Its always better to under mix than over mix, because once your batter becomes too runny you won't be able to pipe them.


Step 5
Pipe the batter on a silicone baking sheet or parchment paper kept on a baking tray, into a little larger than coin sized circles, by holding the bag at 90 degrees, lightly pressing down and using a finger to hold the bag steady. When all most done, quickly release the bag so that you don't end up with a long pointy tail. The idea is to have uniform smooth shells as far as possible. If you want you can print out this template here and place it under the baking sheet to make it easier to pipe out neater circles. However make sure you remove the template before popping them in the oven else it will burn!

How to hold the bag: Hold and apply gentle pressure to the top of the bag
and use your  other hand as a guide so the tip is steady

Step 6:
Pick up and drop/rap the tray on the counter to get rid of air bubbles, sprinkle with coffee powder, chocolate sprinkles, cinnamon, grated nuts zest or other unmeltable topping and lay to rest for about an hour to form a skin on the surface. You can speed up this step by using a hair dryer. Drying the shells is important in getting the ruffle like underside and a smooth un-cracked top so make sure you do this!


Step 7:
Then take the baking tray and put another one underneath it (doubling the tray) and bake after lowering the preheated oven temperature from 350 to 325 F for 9 mins. Remember to rotate the pan half way so that they bake evenly. After baking make sure that if using a dark coloured tray that you remove the parchment paper containing the macarons to the counter within 3 mins else they will get overbaked. Remember each oven is different and you may have to play around with the oven settings to make sure it works for you. I found that 325 F was fine for me but that I had to bake them for about 15 mins. So test with a small batch for the first few times. 

See my babies straight from the oven with their perfect "feet"- the ruffle like underside which is the subject of much contemplation amongst the macaron pundits. According to Namthip, aging the egg whites and doubling the pan, along with the dry tops helps to ensure that the foot develops


Step 8:
Once cool, peel off the parchment paper to release the shells. Sometimes they may stick to the paper. If this happens it migh tbe a sign that it is underbaked, especially if the inside seems too sticky. In that case quicky put them back in the oven and bake for a few more minutes. To make it easier to release, you can try putting the whole sheet when it is still warm, into the freezer for about a minute and it will be much easier to peel off the paper/mat

Next, hold the shell steady to pipe some filling onto it. Then top with a similar sized shell and "twist into place so that a little of the filling is seen sandwiched between the shells


For more info check out this wonderful document by Helene of mytartlette.com called Demystifying Macarons

Here are some more tips from Namthip's site www.namthip.com:
Before piping, check for:
- Shine
- The folded batter should slowly spread
- Put a drop of batter and see if it holds its shape
-Check for doneness after baking– Lightly jiggle the shell
- It should not slide off
- It should move slightly
- It should spring back
If under baked, you can put it in the freezer for a few minutes so that it hardens. Remember under baked is better than over baked!
Other tips:
-- Use flavorings with low moisture content; oil, extract, powder, zests, coconut flakes
- Bake on two sheet pans (Keeps the heat away from the bottom longer allowing the foot to develop)

Here is Namthip's cute dog Yindi joining in on the fun. he was pretty involved in the class too and seemed to know exactly when the macarons in the oven were done!

The classes were at San francisco and here are some pics from the rest of the day :)

Ommm nom nom.. the hungry cable car can't have enough!


There was also a little store called Chocolate Covered where the floor to ceiling is covered in little sweet boxes printed with famous SFO landmarks, signage and people, made by the owner. He can also custom make one with your pictures. Pretty cool.


Because my colourful assortment of macarons reminded me of my colourful festival memories I am sending them to this month's Mactweets Mac Attack  with the theme of Childhood summer memories this month.


I have always wanted to take part in macattack, and with my very first batch now I can!
I am so proud of my lovelies I am also sending them to Sugar High Fridays: Bite sized desserts,  hosted this month by the amazing Aparna of My Diverse Kitchen.
Thank you T for an awesome day and for fueling my macaron madness!