Showing posts with label beans. Show all posts

Quick Skillet Garlic Green Beans

Quick Skillet Green Beans

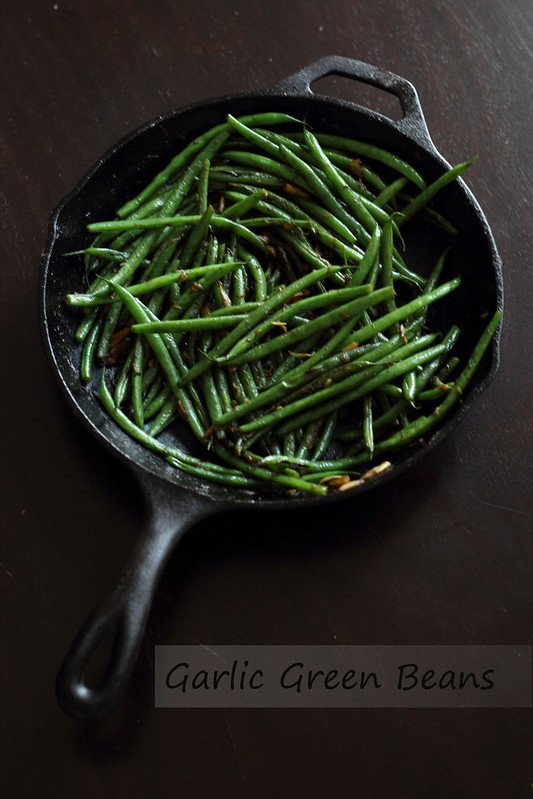
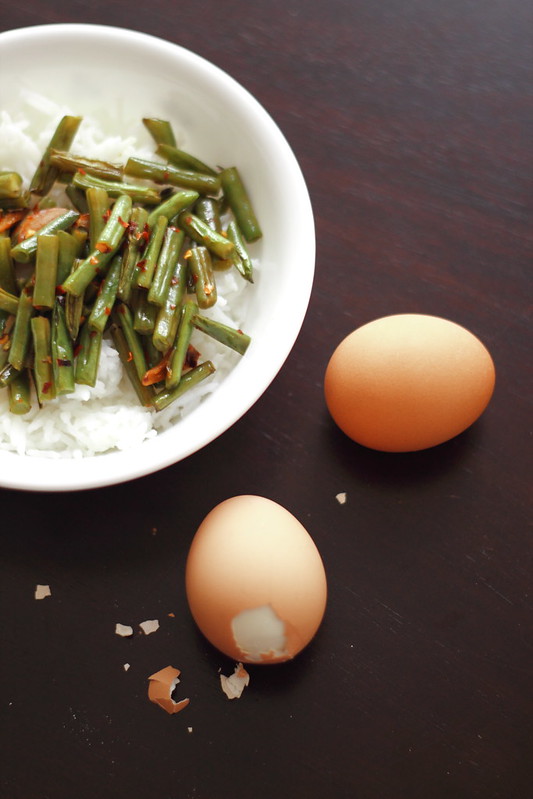
Sometimes there is perfection in the simplest of things. Like a bunch of french beans, quickly sauteed in light olive oil, with a little caramelized garlic and a sprinkling of chilli flakes for heat. Served over rice, with a soft boiled egg, this is my idea of a perfect meal.

Garlic Green Beans

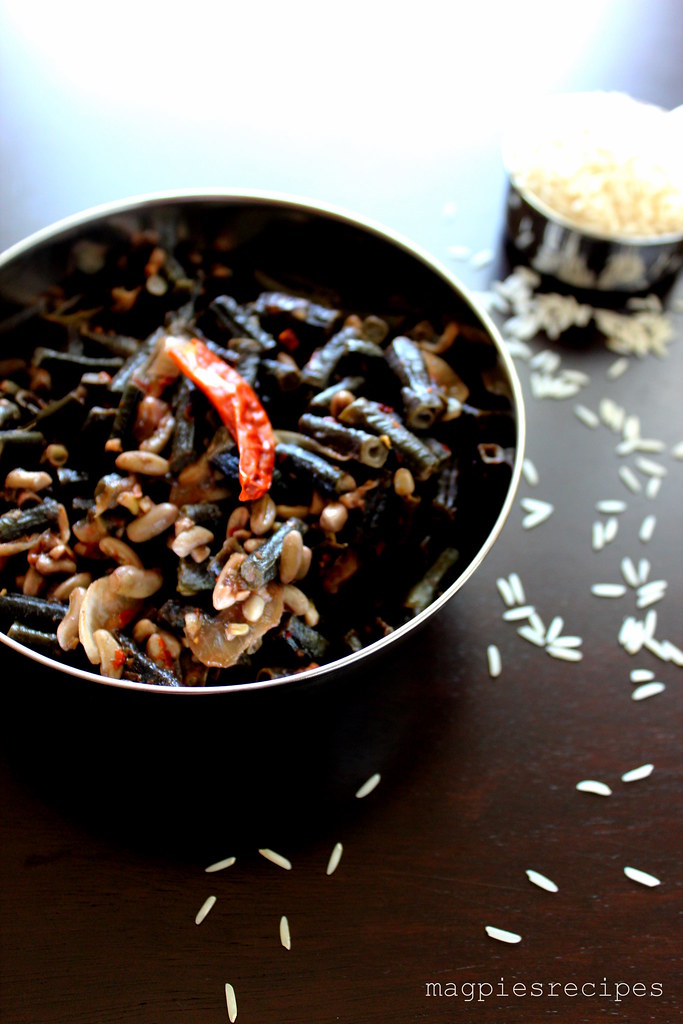
We eat beans a lot. All kinds. This long beans stir fry is a favorite. And then of course there are dried beans ( lentils) of all kinds. Red Beans and Pumpkin EriserryYellow Dal and Green Mung, and another simple ever-favorite, the humble Horsegram (Muthira) What's not to love about legumes? They are inexpensive, easy and quick to cook, nutritious and delicious.

I am sharing this green beans saute with some other legume lovers over at My Legume Love Affair that was started by Susan  and is now being run by Lisa, and if you love legumes as much as we do, you should definitely join in the fun. 

Quick Skillet Green Beans

Do you think beans are boring ? Or do you think of magic, and of Jack and the beans stalk? Of something amazing that can come from something so ordinary? 

Whenever I see beans, I think of my little brother. He is not so little now, but when you have a brother who is nine years younger than you, he is your first baby and will always be. My sister and I and we were fiercely protective of him from the second he was born. While my sis and I went through our share of sibling rivalry and quarrels, with my brother things were different. We big sisters were happy to pamper him. He was just the cutest little kid. Light brown eyes framed by long lashes, and the sweetest, widest smile on his chubby face. Most little girls had dolls to play with. My sister and I were lucky enough to have our own live, little doll! Yes, the poor thing had to go through a lot of tea time, dress-up and worse! 

I could not believe it when I went off to college and during that time our happy chatterbox grew into a quiet teen who towered over us at 6 feet tall. Today I cannot believe he is twenty, almost done with his studies and ready to join the work force.

But once, he was five, and a sweet little boy who, like Jack, had a beanstalk. Well, my mother planted it, but it was the five year old, whose job it was to water it and he did so, enthusiastically. One of my most cherished photographs has a disheveled, chubby little toddler, who (in my mind at least) can never grow up, dutifully watering his beans plant. And that's the image that came into my mind, looking at that bag of beans at Costco.

  Quick Skillet Green Beans

I don't shop at Costco ( a popular warehouse store that has stores across the US and some other countries) too often, but every two months or so I make a trip there, armed with a long list. I bring back giant bottles of nuts, bags of rice, cereal, pasta and sugar and other staples and very occasionally some treats like those fantastic chocolate covered berries or giant bottles of nutella that really should be out lawed. I take shopping for groceries very seriously and like to take my time, moving slowly from one aisle to the next, scanning every ingredient list and tasting samples. Grocery shopping is just one of those things I really, really enjoy. I think I just like to be surrounded by food or the promise of the many meals I will get to cook :)

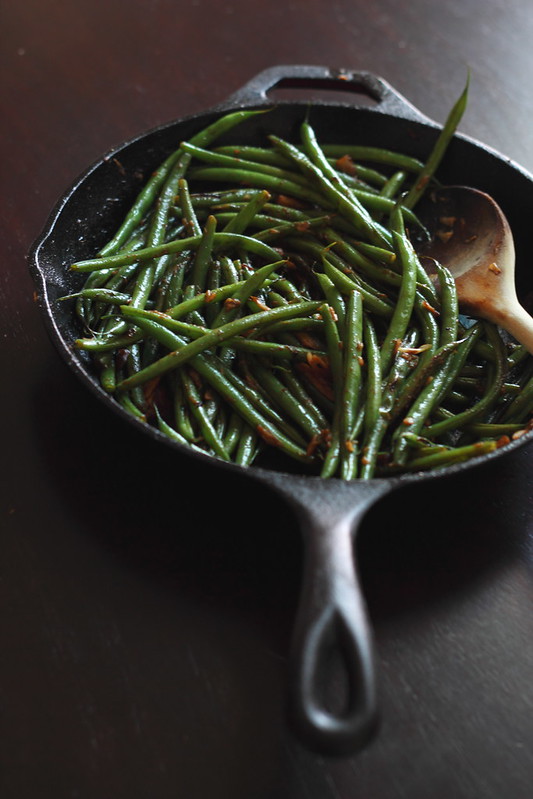
This time I was happy to see a huge bag of tender green beans, and I had only this one thing in mind to do with them- sautee them with garlic, and that's all I did with the entire bag. No complaints.

Quick Skillet Garlic Green Beans
Ingredients:

  • French Green Beans or String Beans- 1 1/2 pounds
  • Garlic- 5 cloves sliced into wedges
  • Chilli flakes- 1-2 tsp ( optional) 
  • Extra light Olive Oil or Canola oil- 2 tbsp 
  • Salt to taste

Directions:

Cut the end off the green beans and if you like cut them up into shorter pieces ( easier to eat this way)
Heat the oil in a skillet and saute the garlic until crisp and light brown.
Add the chilli flakes and salt and stir for a few seconds
Add the washed and cut beans and stir to cover evenly with the oil.
Cover the skillet with a lid and leave to cook, stirring occasionally.
The beans should still have a bite to them but no longer taste raw.
Serve with rice or as a side to meat or pasta. 

muthira horsegram lentil and crushed garlic curry


Muthira curry instantly takes me back to the dining table in my grandmother's home in our little village deep in lush green Kerala. Dancing paddy fields, canoes floating down the river and the young, laughing faces of my cousins come to me with every spoonful.

Whenever we were all visiting, my aunt and grandmother would prepare a feast for us. After many rich and heavy meals we would begin to crave the simple and light muthira curry my grandmother makes by simmering the tiny cooked lentils with chilli flakes, crushed shallots and garlic that has been lightly browned  in hot coconut oil and turned fragrant.

We would devour it by the bowlfuls on its own or as usually served, with rice and pickles and a simple vegetable stir fry. After hours of running around her little farm or playing it the large sand pit in the kaiyala or courtyard we would run back into the house, our tummys growling as we ransacked the kitchen to mop up any muthira curry leftover from lunch with slices of soft bread!


 A simple and comforting lentil curry that is made everyday across homes in Kerala, from very few, simple ingredients. If you have never tried cooking Indian food, this delicious basic lentil stew is a good place to start.


This post is part of my Kerala cooking basics series over at The Kerala Kitchen. so head on over there for the recipe and the basic "formula" to cook most lentils

I am also sending this to The IndianFoodPalooza a wonderful celebration of Indian cooking! 

Kerala Beans Stirfry/ Payar Mezhukkupuratti

Kerala beans stir fry

When ever our large clan gets together in Kerala, all the women folk converge at the kitchen table and you will hear them laughing and talking as their fingers fly splitting open long pods of beans into neat little piles of shiny plump little beans. We kids used to run around the group of aunties who didn't seem to mind or even notice us as they peeled and chopped onions, pounded spices, sizzled mustard seeds, stirred curries and efficiently cooked enough food to feed an army or one hungry brood!


Kerala beans stir fry


This time when I visited Kerala, I very eagerly joined my aunts in the kitchen. They were very patient with how slow I was compared to them and they overlooked the fact my pile comprised of more pod bits. I still don't have the patience to carefully pry open even the stubborn tender parts of the bean pod which house the tiniest of beans so I break off that part of the pod with the skin though my aunts can coax a bean out of even the narrowest parts of the pods.


beans


This simple garlicy and spicy stir fry of beans is made very often and it's one of my favourites. I could eat a bowlful and it is very easy to make, if you can get past the pesky shelling or do what I do and simply break up the pods into little sticks if you don't mind the skin like me.


I was very happy to see these long beans at the farmer's market here. I think they are called Red Chinese long beans here and are available all year round. As soon as I saw the bunch I immediately wanted to make them into this beans stir fry which is all I can imagine making with them! You can use any variety, even french beans which you wouldn't be able to shell but simply break up. 


This type of preparation using just oil and spice sometimes onion and garlic is called "Mezhukkupuratti" in most parts of Kerala, meaning smeared with oil. It is often used to cook a variety of vegetables and is one of the most basic and popular ways to cook vegetables in South India. Thoran is a similar vegetable preparation but with the addition of shredded coconut and often tempered mustard seeds as well.


I know I post a lot of cake on this blog. I enjoy baking and I do love cake. But what we eat most of the time are simple vegetable or lentil dishes like this that get cooked in a hurry, usually about an hour before  dinner time and it's too late and too dark to take pictures. This year I hope to share more of these delicious and healthy dishes which very unfairly didn't get the attention that they deserve. Hopefully this will motivate me to also start cooking earlier, not scramble around in the evening trying to throw a meal together. Thankfully quick, healthy meals like this can also be super delicious!


Apple pie cake aka Marie-Helene's Apple Cake from Dorie Greenspan


Did you all have a fun weekend? I did! We took the little monkey to our county fair and he was mesmerized ( and just a little scared ) by the crowds, the heat, the colourful spinning rides, the animals- (including two llamas!), the music and the fireworks from friday night on, which he insisted on NOT watching, covering his eyes :( Tonight, though I was super thrilled to catch the fourth of July fireworks, from over the Golden Gate bridge, which is celebrating its 75th anniversary this year! Whoa! I love the Golden Gate bridge, love seeing it in the distance, parts of it disappearing under  the thick fog so that it looks magically suspended in the clouds, and I still ( after two years) always feel really excited when we drive over it, so catching the fireworks over the Bay was just a special treat. 


Something else I love? I love the smell of apple pie baking in the oven. The delicious aromas of baking apples, pastry and cinnamon fills the entire house and announces the arrival of good things, and seriously what could be better than a slice of warm, freshly baked apple pie topped with a scoopful of salty caramel ice cream? Nothing, except maybe this cinnamony apple pie cake :)


Yes, you read it right: its apples and cinnamon, but baked into a cake, so no need to bother with that fiddly pie crust. It's quite amazing. It is so full of apples and the texture is not really like a sturdy cake but veering more toward an apple y  bread pudding, and the flavours are unmistakably that of apple pie so that's why I call it apple pie cake and I'm sticking to it!


This was the first thing I took out of the new oven in the house we moved to last month. I didn't get to post because this chocolate Oreo cake too its place. And yes, some days, special days, you need a fluffy frosted cake covered in Oreos, or a barely chocolatey cake covered in Nutella frosting roses and ruffles ( yes the birthday cake, that's coming here soon!) but not everyday. This apple pie cake however, I would be very happy to eat everyday :) Its perfectly easy to make, all the equipment you need is a bowl and a whisk- no food processor, mixer or rolling pin needed.


Cinnamon Apple Braided Brioche Bread

I totally love baking apples into pies, breads, tarts and cakes. There is nothing I love more than the smell of baked apples and cinnamon, except for the smell of yeasty bread so why not combine the two huh? Let me tell you how fantastic that idea is!
A soft, rich, decadent brioche that lovingly wraps around a filling of apples, cinnamon and caramelized brown sugar. And while this may look like I spent 10 hours slaving over, its really quite easily done. I used the pre-made and refrigerated, no-knead brioche recipe from Artisan Bread in 5. Seriously Zoe and Jeff, like hundreds of others, I love you guys. As you may have realized, I have much love for genius chefs and foodies who come up with easy ways to make delicious goodies, with simple tools like a mixing bowl and a spoon. 


Cinnamon Apple Braided Brioche Bread
Recipe source: slightly adapted from Artisan bread in 5 minutes a day from their website here
Brioche dough (makes about 4 loaves- I used only half the recipe) 
You could also use the slightly less decadent Challah dough (see here
Ingredients:
  • 1 1/2 cups lukewarm water
  • 1 1/2 tablespoons granulated yeast (2 packets)
  • 1 1/2 tablespoons kosher salt
  • 8 large eggs, lightly beaten
  • 1/2 cup honey 
  • 1 1/2 cups (3 sticks) unsalted butter, melted
  • 7 1/2 cups unbleached all-purpose flour
Method:
Mix the yeast, salt, eggs honey and melted butter with the water in a 5-quart bowl, or lidded (not airtight) food container. I used a largeglass  mixing bowl ( one from set of  Pyrex stackable, lidded ones I love and use for prepping, storing or reheating daily) 
Mix in the flour, using a spoon until all of the flour is incorporated.
Cover (not airtight), and allow to sit at room temperature for about two hours.
The dough can be used as soon as it is chilled. This dough is way too sticky to use after the initial rise, but once it is chilled it is very easy to handle. 
Zoe also uses this same dough to create other goodies like this Tatincaramel sticky bunsgrilled fruit tartFresh Fruit Muffins,Brioche à têteapricot pastries and even doughnuts! The dough can be stored in the refrigerator for up to 5 days. After that you can freeze the dough.


For the Apple filling:
1/4 to 1/2 cup brown sugar
1 tbsp cinnamon pwd
1 apple ( I used a sweet gala apple but you could use any) slice thin with a knife or mandoline )


Eggwash
1 egg (lightly beaten) mixed with 1 tbsp water


Mix the brown sugar and cinnamon powder for the filling
Take the brioche or challah bread from the fridge and working quickly, roll it out on a baking sheet or silpat.
Roll the dough into a rough rectangular shape
Spread out the filling in the center portion of the rectangle and lay out the apple slices over it.
With kitchen shears or a pizza cutter cut evenly spaced strips on both sides of the filling and lightly egg wash them ( The egg wash acts like a glue)
Fold the strips over the filling, crossing one strip from one side over the other, and pinch them together. Zoe suggested something I missed- Make sure that there is quite a bit of excess dough beyond the point where you pinch them together. If you pinch right at the ends it will bust open when baking. Hence you may notice that some of my filling has come out :( 
For a far more easier to understand pictoral how-to see the Danish Braided Bread from Artisanbreadin5 here or their fabulous book.


Let the braid sit loosely covered with plastic wrap ( I didn't cover mine) for about 40 mins
Slide the braid on the baking mat to a cookie sheet/baking tray
Preheat oven to 375 degrees
Lightly coat the bread with egg wash and sprinkle with regular or pearl sugar, a sprinkling of slivered almonds if you like, and bake in the middle rack of your oven for 20 mins or until a tooth pick insirted into the center of the bread comes out clean.
If you can wait that long, allow to sit for about 15 mins before cutting slices off and serving. 
And yes, yes of course you'd like to try other fillings- savoury like feta cheese and spinach, or as Zoe suggests in her Danish Braid:
1/2 cup softened cream cheese, 
3 tablespoons sugar, 
1 teaspoon vanilla, 
raspberry preserves and fresh blackberries or other fruit like peaches, pears... many many beautiful possibilities.


Am sending my gorgeous braided brioche to this month's Monthly Mingle hosted by the passionate about baking Deeba with the theme 'baking with fruit'.

Beer Bread-No Yeast No Knead Dairy-free Egg-free Quick Bread


I have been on a baking spree baking cakes and cupcakes and the Geek finally rebelled saying that my baking was going to give him diabetes. So I decided to turn to baking bread and have been thumbing thorough some cook books including 'Baking with Julia' and trying to decide between the 'Artisan Bread in Five Minutes a Day' method or the No-Knead Bread by Lahney. But most of these definitely simple recipes still seemed to require a bit of commitment of time and tools I didn't have, until I found this easy, almost absurdly simple and too-good-to-be-true recipe for Beer Bread.


(Update: I have since this post gotten over my fear of yeast and made and love the Brioche bread from Artisan Bread in Five Minutes a Day. Check out my beautiful apple, cinnamon and brown sugar filled braided bread here I am now a bread fanatic!)


Immediately bells began to ring and I ran to George the grocer's little store and asked him for one single bottle of ale- "To make bread" I explained while he looked at me puzzled.


With the world cup quarter finals tomorrow-what could be a better snack for the football obsessed than beer bread? This is one easy and tasty bread that has the flavor of the beer and requires no yeast, no raising, kneading and all that mess.
I added some garlic powder and oregano for some extra yuminess. The crust is crispy and the insides soft and springy as all good bread should be. Still can't get over how easy this is- Just mix, pour, bake!Can all be done in just one dish too


Beer Bread
Recipe source: Gerald Norman on Recipezaar from here

Ingredients
  • 3 cups flour (sifted- make sure to sift else bread will be hard)
  • 3 teaspoons baking powder (omit if using Self-Rising Flour)
  • 1 teaspoon salt (omit if using Self-Rising Flour)
  • 1/4 cup sugar
  • 1 (12 ounce) can beer 9 recommend using either stout like Guinness or ale )
  • 1/4 cup melted butter or olive oil ( I used oil olive)
  • I also added 1 tsp garlic powder and 1 tsp oregano-optional
Method
  • Preheat oven to 375 degrees.
  • Mix dry ingredients and beer.
  • Pour into a greased loaf pan.
  • Pour melted butter/olive oil over mixture.
  • Bake for 1 hour or until a toothpick inserted in the center comes out clean. Remove from pan and cool for at least 15 minutes. If you don't remove it and keep the bread in the pan the bottom may get soggy.
Below are some helpful notes by Gerald : 
This recipe makes a very hearty bread with a crunchy, buttery crust. If you prefer a softer crust (like a traditional bread) mix the butter into the batter instead of pouring it over the top.
Sifting flour for bread recipes is a must-do. Most people just scoop the 1 cup measure in the flour canister and level it off. That compacts the flour and will turn your bread into a "hard biscuit". That's because they aren't sifting their flour! 
If you do not have a sifter, use a spoon to spoon the flour into the 1 cup measure.
If using non alcoholic beverages then add a packet of Dry Active Yeast or 2 teaspoons of Bread (Machine) Yeast so that you get a proper rise.
Put a baking sheet or tray under the dish so that any butter that bubbles over doesn't spill onto the oven floor and catch fire.

Verdict:
Hic! The beer taste in the bread was prominent and I loved it even thought I don't even like beer! I halved the ingredients as I wasn't sure I'd like it so my bread was quite small and was all gone in seconds. Next time I will double it and make two full loves as everyone loved it and tore off chunks of this soft bread with a crunchy top.You don't have to like football or even beer to love this, whether you are making it or eating it.
Take it along for the next tailgate party and you will be the star!