Showing posts with label basics. Show all posts

Masala Chai Concentrate and a Straining Saucepan Giveaway

Masala Chai Concentrate

I had just moved into an apartment with a kitchen during my student days. I barely knew to cook and along with my roommates  had just set up our kitchen- a rented fridge, a small gas stove and a toaster oven and a few pots, pans, spices and bags of lentils we had each brought from our mother's kitchens.
We were all set and felt so grown up, even though none of us had accomplished cooking anything more than rice and dal, and that was dinner on most days. We didn't really feel the need to learn anything more, as when we got tired of dal, restaurants delivering delicious and cheap but greasy food right to your home and even home cooks who brought healthy, homemade meals for us "bachelors" (and bachelorettes) were only a phone call or a short walk away.
But on that rainy Sunday, my roommates and I were stuck at home, with a yearning for masala chai.

Masala chai or spiced ginger tea is popular and easily available at tea stalls all over India. It tastes best drunk out of little cut- glass tumblers on a crowded street full of life and color and is a great picker upper when you are tired after a long day, or a chilly, rainy one. On that bleak, grey morning many years ago, we began to talk about masala chai and I grew increasingly desperate for some.

The only problem was that I had no idea how to make tea, so I had to look it up in a cookbook, (my first ever), a used copy of Modern Cookery picked up on a whim from a pavement book seller near Besant Nagar Beach, because I remembered seeing it on my mom's bookshelf.

Luckily we found a bag of loose tea leaves and the required spices among the stuff our mothers had packed for us and I followed the steps that included filling a saucepan with "fresh bubbling water" from the tap. Thank you and your detailed instructions Thangam E. Philip!
I boiled milk along with twice the amount of water, added a piece of smashed ginger, pepper, cloves, cardamon and cinnamon on our little stove. I waited until it came to a rapid boil, then threw in a teaspoon of of tea leaves for every cup of tea as Ms Thangam instructed me to, then turned down the heat and let it simmer and then boil alternately until the tea and spices infused the tea with warmth and strength as I had seen the chaiwallahs ( tea stall man in North India, called chaya kada karan in the South) do.

That first cup of tea was absolutely wonderful, and soon my roommates and I discovered that a steaming cup of spiced ginger tea and a warm piece of toast spread with cold butter or jam was one of the best things in life to wake up to. For some reason I became the official chaiwallah of the house, followed by which I soon mastered or atleast became familiar with cooking some simple things. Ofcourse there were lots of disasters too, and sometimes even today, but they all help me learn what not to do!

Masala Chai Concentrate

Many years have passed and I no longer need a cookbook to make chai, and today, cooking is no longer a necessity for me, but more of an obsession!

Whenever my mother in law comes to stay with us, tea and toast is our little ritual that we share before we begin the day and whenever the weather is chilly, and especially when one of us is fighting a cold, she asks me to make my "special" masala chai.
The steam opens up blocked nasal passages, and the spices soothe and heal a sore throat. Along with Mummy's special blend of homeopathic remedies, a warm cup of the masala chai is sure to chase away colds.

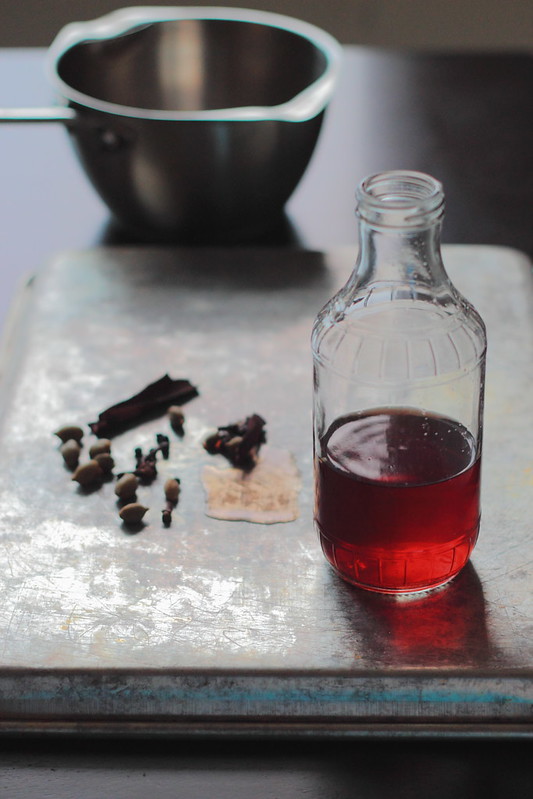
This masala tea concentrate is for those days when you need that spicy kick in your tea, but are short on time. I boil the spices in water before hand, cool the liquid and store it in a bottle in the fridge. I only make a little at a time, but you can increase the amount to make for the week ahead. Pour it into a pretty bottle and the beautiful golden red liquid would also make a nice gift for the tea lovers in you life.

I can also see many other uses for the concentrate,to poach fruits, make into a syrup for desserts, maybe even in savory cooking uses.

Masala Chai Concentrate

Update: THIS GIVEAWAY IS NOW CLOSED

The GitiaDini Straining Saucepan is perfect for making this masala chai concentrate because it has deep pour spouts and  a strainer inbuilt. Such a clever idea, making it ideal to cook rice, pasta, vegetables, soup and anything else that may require pouring and straining, without needing a separate colander or strainer. If you want to strain very finely, ( for example tiny tea leaves) you may find the holes a little large and may want to use a mesh strainer, but for most things like rice, pasta, vegetables and larger spices like those used in this spice concentrate  it works great. I wish it came with a lid, but was happy to find that I had several lids from other pans at home that fit perfectly.

I like that the sides are also slightly rounded making it easy to stir things and it is just the right size at 2 quarts- making me reach for it often. It has a nice heft to it and is well made. I have had it for about two weeks and so far I have used this pot almost exclusively for all kinds of things and would definitely recommend it.

My Photo
I am happy that the lovely people at GitaDini  giving away a Straining Saucepan to one of Magpie's Recipes' readers.
Here is how you can enter the giveaway and gain extra entries:

1. To enter: Leave one comment on this post telling me what you would use the straining saucepan for
2. Extra Entries: Like or follow Magpie's Recipes on FacebookTwitterGoogleplus or Pinterest and leave a comment saying you did,  a separate comment for each
3. Extra Entries: Like or follow GitaDini on Facebook, TwitterGoogle Plus, Pinterest, and leave a comment here saying you did, a separate comment for each
4. Extra entries: Share, tweet or pin this giveaway and leave a separate comment saying that you did for each

The contest will close on March 31st and winners will be announced shortly after and the saucepan will be shipped by GitaDini to any address here in the US. Winners will be chosen using random, so the more entries you have, the more likely you are to win. Make sure you have a US address if you take part!

If you want to check out all the other cool products by GitaDini like the Rotito Roti Rolling Board set and the fun Ying Yang spice box, visit their website.

Recipe for Masala Chai Concentrate
Yield: Enough concentrate for two cups of tea, increase proportionately to make more

Ingredients:
  • Water 2 1/2 cups 
  • Cinnamon 1 stick
  • Ginger 1 inch piece smashed with the heel of your knife or in a mortar and pestle ( no need to grind, just smash it once or twice to release juices)
  • or Ginger powder 1/4 tsp
  • Cloves 6
  • Cardamom 6
  • Whole Pepper corns 10 or 1/4 tsp fresh ground pepper

Instructions:
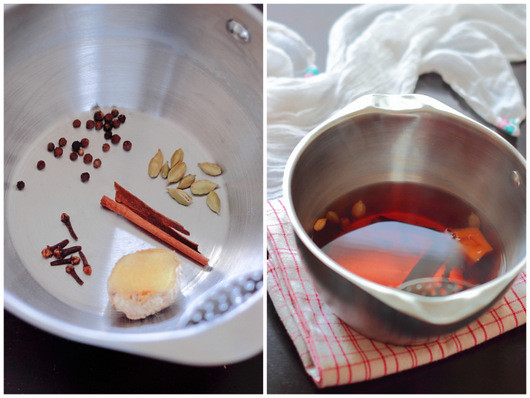
  • Add the spices to the water and bring to a boil on medium heat.
  • Reduce the heat to low and simmer for about 30 mins to infuse the water with the spices
  • Cool,strain, bottle and store in the fridge.

When you want to make your tea, just  pour a cupfull of the concentrate into a mug,
Add a dash of milk ( I add only about 2 tablespoons of milk, increase if you like your tea more milky) to the concentrate,
Heat until boiling ( 2 mins on high in the microwave should do)
Add a tea bag and let it infuse for 2 to 4 mins depending on how strong you like your tea.
Enjoy a cupfull of bliss :)

You can use spices of your choice- (ground nutmeg or dried mint would be a great addition), some people prefer to leave out the pepper as it can be a little prominent.
Use a black tea you like to drink, I have used Darjeeling, orange pekoe or even Mummy's favorite Twinings Earl Grey tea.

Please note: I received no compensation from GitaDini  or anyone else to write this review for the sample saucepan they sent me. All opinions are strictly my own, from the two weeks that I have rigorously used this saucepan.

Quick Skillet Garlic Green Beans

Quick Skillet Green Beans

Sometimes there is perfection in the simplest of things. Like a bunch of french beans, quickly sauteed in light olive oil, with a little caramelized garlic and a sprinkling of chilli flakes for heat. Served over rice, with a soft boiled egg, this is my idea of a perfect meal.

Garlic Green Beans

We eat beans a lot. All kinds. This long beans stir fry is a favorite. And then of course there are dried beans ( lentils) of all kinds. Red Beans and Pumpkin EriserryYellow Dal and Green Mung, and another simple ever-favorite, the humble Horsegram (Muthira) What's not to love about legumes? They are inexpensive, easy and quick to cook, nutritious and delicious.

I am sharing this green beans saute with some other legume lovers over at My Legume Love Affair that was started by Susan  and is now being run by Lisa, and if you love legumes as much as we do, you should definitely join in the fun. 

Quick Skillet Green Beans

Do you think beans are boring ? Or do you think of magic, and of Jack and the beans stalk? Of something amazing that can come from something so ordinary? 

Whenever I see beans, I think of my little brother. He is not so little now, but when you have a brother who is nine years younger than you, he is your first baby and will always be. My sister and I and we were fiercely protective of him from the second he was born. While my sis and I went through our share of sibling rivalry and quarrels, with my brother things were different. We big sisters were happy to pamper him. He was just the cutest little kid. Light brown eyes framed by long lashes, and the sweetest, widest smile on his chubby face. Most little girls had dolls to play with. My sister and I were lucky enough to have our own live, little doll! Yes, the poor thing had to go through a lot of tea time, dress-up and worse! 

I could not believe it when I went off to college and during that time our happy chatterbox grew into a quiet teen who towered over us at 6 feet tall. Today I cannot believe he is twenty, almost done with his studies and ready to join the work force.

But once, he was five, and a sweet little boy who, like Jack, had a beanstalk. Well, my mother planted it, but it was the five year old, whose job it was to water it and he did so, enthusiastically. One of my most cherished photographs has a disheveled, chubby little toddler, who (in my mind at least) can never grow up, dutifully watering his beans plant. And that's the image that came into my mind, looking at that bag of beans at Costco.

  Quick Skillet Green Beans

I don't shop at Costco ( a popular warehouse store that has stores across the US and some other countries) too often, but every two months or so I make a trip there, armed with a long list. I bring back giant bottles of nuts, bags of rice, cereal, pasta and sugar and other staples and very occasionally some treats like those fantastic chocolate covered berries or giant bottles of nutella that really should be out lawed. I take shopping for groceries very seriously and like to take my time, moving slowly from one aisle to the next, scanning every ingredient list and tasting samples. Grocery shopping is just one of those things I really, really enjoy. I think I just like to be surrounded by food or the promise of the many meals I will get to cook :)

This time I was happy to see a huge bag of tender green beans, and I had only this one thing in mind to do with them- sautee them with garlic, and that's all I did with the entire bag. No complaints.

Quick Skillet Garlic Green Beans
Ingredients:

  • French Green Beans or String Beans- 1 1/2 pounds
  • Garlic- 5 cloves sliced into wedges
  • Chilli flakes- 1-2 tsp ( optional) 
  • Extra light Olive Oil or Canola oil- 2 tbsp 
  • Salt to taste

Directions:

Cut the end off the green beans and if you like cut them up into shorter pieces ( easier to eat this way)
Heat the oil in a skillet and saute the garlic until crisp and light brown.
Add the chilli flakes and salt and stir for a few seconds
Add the washed and cut beans and stir to cover evenly with the oil.
Cover the skillet with a lid and leave to cook, stirring occasionally.
The beans should still have a bite to them but no longer taste raw.
Serve with rice or as a side to meat or pasta. 

muthira horsegram lentil and crushed garlic curry


Muthira curry instantly takes me back to the dining table in my grandmother's home in our little village deep in lush green Kerala. Dancing paddy fields, canoes floating down the river and the young, laughing faces of my cousins come to me with every spoonful.

Whenever we were all visiting, my aunt and grandmother would prepare a feast for us. After many rich and heavy meals we would begin to crave the simple and light muthira curry my grandmother makes by simmering the tiny cooked lentils with chilli flakes, crushed shallots and garlic that has been lightly browned  in hot coconut oil and turned fragrant.

We would devour it by the bowlfuls on its own or as usually served, with rice and pickles and a simple vegetable stir fry. After hours of running around her little farm or playing it the large sand pit in the kaiyala or courtyard we would run back into the house, our tummys growling as we ransacked the kitchen to mop up any muthira curry leftover from lunch with slices of soft bread!


 A simple and comforting lentil curry that is made everyday across homes in Kerala, from very few, simple ingredients. If you have never tried cooking Indian food, this delicious basic lentil stew is a good place to start.


This post is part of my Kerala cooking basics series over at The Kerala Kitchen. so head on over there for the recipe and the basic "formula" to cook most lentils

I am also sending this to The IndianFoodPalooza a wonderful celebration of Indian cooking! 

Kerala Beans Stirfry/ Payar Mezhukkupuratti

Kerala beans stir fry

When ever our large clan gets together in Kerala, all the women folk converge at the kitchen table and you will hear them laughing and talking as their fingers fly splitting open long pods of beans into neat little piles of shiny plump little beans. We kids used to run around the group of aunties who didn't seem to mind or even notice us as they peeled and chopped onions, pounded spices, sizzled mustard seeds, stirred curries and efficiently cooked enough food to feed an army or one hungry brood!


Kerala beans stir fry


This time when I visited Kerala, I very eagerly joined my aunts in the kitchen. They were very patient with how slow I was compared to them and they overlooked the fact my pile comprised of more pod bits. I still don't have the patience to carefully pry open even the stubborn tender parts of the bean pod which house the tiniest of beans so I break off that part of the pod with the skin though my aunts can coax a bean out of even the narrowest parts of the pods.


beans


This simple garlicy and spicy stir fry of beans is made very often and it's one of my favourites. I could eat a bowlful and it is very easy to make, if you can get past the pesky shelling or do what I do and simply break up the pods into little sticks if you don't mind the skin like me.


I was very happy to see these long beans at the farmer's market here. I think they are called Red Chinese long beans here and are available all year round. As soon as I saw the bunch I immediately wanted to make them into this beans stir fry which is all I can imagine making with them! You can use any variety, even french beans which you wouldn't be able to shell but simply break up. 


This type of preparation using just oil and spice sometimes onion and garlic is called "Mezhukkupuratti" in most parts of Kerala, meaning smeared with oil. It is often used to cook a variety of vegetables and is one of the most basic and popular ways to cook vegetables in South India. Thoran is a similar vegetable preparation but with the addition of shredded coconut and often tempered mustard seeds as well.


I know I post a lot of cake on this blog. I enjoy baking and I do love cake. But what we eat most of the time are simple vegetable or lentil dishes like this that get cooked in a hurry, usually about an hour before  dinner time and it's too late and too dark to take pictures. This year I hope to share more of these delicious and healthy dishes which very unfairly didn't get the attention that they deserve. Hopefully this will motivate me to also start cooking earlier, not scramble around in the evening trying to throw a meal together. Thankfully quick, healthy meals like this can also be super delicious!


Cinnamon Caramel Bubble Bread Christmas Breakfast worthy

"When we recall Christmas past, we usually find that the simplest things - not the great occasions - give off the greatest glow of happiness." ~ Bob Hope


Hey! I just got back here to the US after the really long flight with the little monkey who was thankfully a very good not-so-squirmy boy. He only complained (complaining to his Ammamma halfway around the world away) when I curtailed his socializing with the other  babies so that we could get back to our seats. Finally we landed and after a mix up with the suitcases (guess red is a really popular colour after all) we got home to T after 24 long hours, just in time to spend Christmas week with him.


We are quickly adjusting back to the routines after my holiday to visit our family  in India. The little monkey has rediscovered all his favorite toys and hiding places and I am back amongst the clatter of pots and pans in my own kitchen where I know where everything is ( mostly). The morning sounds and smells of whole wheat toast popping in the toaster and just brewed  tea is actually quite comforting after elaborate breakfasts of dosas and appams which I will miss in a few days but today, warm butter spread-y toast with a sprinkling of sugar on top, is good enough for me!
(Is anyone else in love with the movie Toast based on Nigel Slater's memoirs btw? Caught it on the flight and had SUCH a bread craving! )


Christmas morning, however is not like any morning is it? It's truly the most magical part of the day I think, when the kids ( and some adults ahem ) are all excited about what Santa left them and soon the living room turns into a scene of wrapping paper and ribbon strewn carnage!  Christmas morning deserves somethign special, like CINNAMON and CARAMEL smothered, warm freshly baked bubble bread! 


 I am sure that everyone is counting down to Christmas too! Can't help being excited about Christmas where ever you are right?  I'm still wondering what to cook for just the two of us so we wont miss too much the feast the rest of our large extended families will be enjoying back in India when they all get together. But there is one thing I'm all set on and that's this cinnamon caramel bubble bread  bread for breakfast. I will be whipping up a batch of the easy, versatile dough and putting it in the fridge until the 25th. I strongly suggest that you do this too. 


This is so the month for cinnamon. I had made a loaf of this gorgeous bubble topped bread the day I saw this on Zoe's blog. Although this type of bread is called monkey bread (No idea why- maybe because you pull it apart with your fingers like monkeys, instead of cutting neat slices like I attempted in the pictures above. Tho that was after we had already devoured most of the loaf ) I prefer the name bubble bread and I'm sticking to it. Why did I wait this long to post it? Because I was waiting for it to seem like the right time for cinnamon. And it finally is.


While Zoe used the more rich Brioche dough seen in this apple brownsugar braided bread, I used and loved her Challah dough recipe which has less eggs and so is less rich though it tastes amazing. It is absurdly easy to make and it has been the recipe that I used the most this year. I have lost track of the number of times I made it during my visit to India, with savoury, fruit and even jam fillings. If you have never made bread before, let Zoe and Jeff convert you with their super easy technique.

 Wish you and your families a very Merry Christmas and an extra special Christmas Morning!


Recipe for the Challah Dough
Recipe source: Zoe and Jeff from their book Artisan Bread in 5. This recipe was also featured on the kitchn and Zoe and Jeff share many recipes and instructions on their site Artisanbreadin5


( Makes enough for 4 loaves so you can halve this quantity) 


Ingredients

1 3/4 cups lukewarm water
1 1/2 tablespoons granulated yeast (2 packets -any kind of yeast is ok)
1 tablespoon salt
4 large eggs, lightly beaten
1/2 cup honey ( I used 1/2 cup sugar instead)
1/2 cup unsalted butter, melted (or neutral-tasting vegetable oil such as canola- I used oil), plus more for greasing the cookie sheet
7 cups unbleached all-purpose flour
Egg wash (1 egg beaten with 1 tablespoon of water- I omitted this and just brushed the tops with butter)
Method
1.Mix the yeast, salt, eggs, honey, and melted butter (or oil) with the water in a 5-quart bowl, or a lidded (not airtight) food container. I used my extra large pyrex bowl. 
2. Mix in the flour without kneading, using a spoon.You may need to use wet hands to incorporate the last bit of flour.
3. Cover loosely with a lid or a large plate (not airtight), and allow to rest at room temperature until the dough rises and collapses (or flattens on top), approximately 2 hours.
4. The dough can be used immediately after the initial rise, though it is easier to handle when cold. Refrigerate in a lidded (not airtight) container and use over the next 5 days. Beyond 5 days, freeze in 1-pound portions in an airtight container for up to 4 weeks. Defrost frozen dough overnight in the refrigerator before using. Then allow the usual rest and rise time as specified in the recipe below.

5. What ever shape you roll it to before baking, allow it to rise for another 1 hour. Then apply an eggwash or spread some butter on the top and bake at 350 F or 180 C for 30 mins for loaves and 15 mins for buns. See step below how to make the bubble bread
How to make the bubble bread, see step by step instructions here  
( Note: Zoe used brioche bread dough instead of the Challah dough which I used) 


My Notes:
I used sugar in place of the honey since the taste of honey doesn't really come through that much, you can use either. Feel free to increase or decrease the amount of sugar. This is a very forgiving recipe

While making the bubble bread, in the instructions it is mentioned to pour the caramel sauce over the bread only once. I think that it deserves some caramel in the middle too, so next time will be pouring more caramel over the first layer of bread bubbles too.
The caramel sauce hardens as it cools. But just microwave or heat it for a little while and it will soften more.
You can also add a tbsp of butter and 1/4 cup of cream to make it more like a pour-able sauce. And hey why not add a dash of rum in it when no one is looking :)

How do they taste? the dough is yeasty, sweet and soft. So its almost like a bunch of dough nut holes bunched together and smothered in warm caramel and cinnamon. Yes, that means this is VERY dangerous stuff. You have been warned.

Apple pie cake aka Marie-Helene's Apple Cake from Dorie Greenspan


Did you all have a fun weekend? I did! We took the little monkey to our county fair and he was mesmerized ( and just a little scared ) by the crowds, the heat, the colourful spinning rides, the animals- (including two llamas!), the music and the fireworks from friday night on, which he insisted on NOT watching, covering his eyes :( Tonight, though I was super thrilled to catch the fourth of July fireworks, from over the Golden Gate bridge, which is celebrating its 75th anniversary this year! Whoa! I love the Golden Gate bridge, love seeing it in the distance, parts of it disappearing under  the thick fog so that it looks magically suspended in the clouds, and I still ( after two years) always feel really excited when we drive over it, so catching the fireworks over the Bay was just a special treat. 


Something else I love? I love the smell of apple pie baking in the oven. The delicious aromas of baking apples, pastry and cinnamon fills the entire house and announces the arrival of good things, and seriously what could be better than a slice of warm, freshly baked apple pie topped with a scoopful of salty caramel ice cream? Nothing, except maybe this cinnamony apple pie cake :)


Yes, you read it right: its apples and cinnamon, but baked into a cake, so no need to bother with that fiddly pie crust. It's quite amazing. It is so full of apples and the texture is not really like a sturdy cake but veering more toward an apple y  bread pudding, and the flavours are unmistakably that of apple pie so that's why I call it apple pie cake and I'm sticking to it!


This was the first thing I took out of the new oven in the house we moved to last month. I didn't get to post because this chocolate Oreo cake too its place. And yes, some days, special days, you need a fluffy frosted cake covered in Oreos, or a barely chocolatey cake covered in Nutella frosting roses and ruffles ( yes the birthday cake, that's coming here soon!) but not everyday. This apple pie cake however, I would be very happy to eat everyday :) Its perfectly easy to make, all the equipment you need is a bowl and a whisk- no food processor, mixer or rolling pin needed.


Cinnamon Apple Braided Brioche Bread

I totally love baking apples into pies, breads, tarts and cakes. There is nothing I love more than the smell of baked apples and cinnamon, except for the smell of yeasty bread so why not combine the two huh? Let me tell you how fantastic that idea is!
A soft, rich, decadent brioche that lovingly wraps around a filling of apples, cinnamon and caramelized brown sugar. And while this may look like I spent 10 hours slaving over, its really quite easily done. I used the pre-made and refrigerated, no-knead brioche recipe from Artisan Bread in 5. Seriously Zoe and Jeff, like hundreds of others, I love you guys. As you may have realized, I have much love for genius chefs and foodies who come up with easy ways to make delicious goodies, with simple tools like a mixing bowl and a spoon. 


Cinnamon Apple Braided Brioche Bread
Recipe source: slightly adapted from Artisan bread in 5 minutes a day from their website here
Brioche dough (makes about 4 loaves- I used only half the recipe) 
You could also use the slightly less decadent Challah dough (see here
Ingredients:
  • 1 1/2 cups lukewarm water
  • 1 1/2 tablespoons granulated yeast (2 packets)
  • 1 1/2 tablespoons kosher salt
  • 8 large eggs, lightly beaten
  • 1/2 cup honey 
  • 1 1/2 cups (3 sticks) unsalted butter, melted
  • 7 1/2 cups unbleached all-purpose flour
Method:
Mix the yeast, salt, eggs honey and melted butter with the water in a 5-quart bowl, or lidded (not airtight) food container. I used a largeglass  mixing bowl ( one from set of  Pyrex stackable, lidded ones I love and use for prepping, storing or reheating daily) 
Mix in the flour, using a spoon until all of the flour is incorporated.
Cover (not airtight), and allow to sit at room temperature for about two hours.
The dough can be used as soon as it is chilled. This dough is way too sticky to use after the initial rise, but once it is chilled it is very easy to handle. 
Zoe also uses this same dough to create other goodies like this Tatincaramel sticky bunsgrilled fruit tartFresh Fruit Muffins,Brioche à têteapricot pastries and even doughnuts! The dough can be stored in the refrigerator for up to 5 days. After that you can freeze the dough.


For the Apple filling:
1/4 to 1/2 cup brown sugar
1 tbsp cinnamon pwd
1 apple ( I used a sweet gala apple but you could use any) slice thin with a knife or mandoline )


Eggwash
1 egg (lightly beaten) mixed with 1 tbsp water


Mix the brown sugar and cinnamon powder for the filling
Take the brioche or challah bread from the fridge and working quickly, roll it out on a baking sheet or silpat.
Roll the dough into a rough rectangular shape
Spread out the filling in the center portion of the rectangle and lay out the apple slices over it.
With kitchen shears or a pizza cutter cut evenly spaced strips on both sides of the filling and lightly egg wash them ( The egg wash acts like a glue)
Fold the strips over the filling, crossing one strip from one side over the other, and pinch them together. Zoe suggested something I missed- Make sure that there is quite a bit of excess dough beyond the point where you pinch them together. If you pinch right at the ends it will bust open when baking. Hence you may notice that some of my filling has come out :( 
For a far more easier to understand pictoral how-to see the Danish Braided Bread from Artisanbreadin5 here or their fabulous book.


Let the braid sit loosely covered with plastic wrap ( I didn't cover mine) for about 40 mins
Slide the braid on the baking mat to a cookie sheet/baking tray
Preheat oven to 375 degrees
Lightly coat the bread with egg wash and sprinkle with regular or pearl sugar, a sprinkling of slivered almonds if you like, and bake in the middle rack of your oven for 20 mins or until a tooth pick insirted into the center of the bread comes out clean.
If you can wait that long, allow to sit for about 15 mins before cutting slices off and serving. 
And yes, yes of course you'd like to try other fillings- savoury like feta cheese and spinach, or as Zoe suggests in her Danish Braid:
1/2 cup softened cream cheese, 
3 tablespoons sugar, 
1 teaspoon vanilla, 
raspberry preserves and fresh blackberries or other fruit like peaches, pears... many many beautiful possibilities.


Am sending my gorgeous braided brioche to this month's Monthly Mingle hosted by the passionate about baking Deeba with the theme 'baking with fruit'.

Green mung rice gruel / Cherupayar with Kanji- Better than Chicken soup!


It has been an eventful last couple of weeks that left me with very little time or energy to post. We were attacked by a horrid flu that had us all sniffling and feverish but the worst were these loud hacking coughs that went on for days. I unearthed this Ogden Nash gem which sums up exactly how we felt.
Thankfully the little jelly bean and my mom in law who is visiting us, escaped the flu and we got over it too, soon enough, just in time for the Bridge school benefit concert!
I also had a pleasant visit by an old college friend who brought me some yummy chocolate fudge and then by my best friend from school! Now eagerly awaiting my visitors this month- a cousin and then my best blogger buddie -Ria of Ria's collection! Can't wait to meet her finally!
Well in the midst of all this I have been cooking and learning from my awesome mom in law who has converted me to into being someone who now uses measurements and actually follows those pesky instructions- the consistent results you get are reward enough! No more wondering what I did wrong this time or if my curries are too salty.
Thought I would post this simple and basic recipe for cherupayar or green mung lentil that I am convinced helped to cure our colds!

I hope you have all been well. But if you have fallen a victim to the nasty flu season too, this simple and hearty lentil dish served steaming hot with rice in the water that it has been cooked in is waaay better than that can of campbells chicken soup I know you were reaching for.
Cherupayar is easy to digest and does not put additional strain on an already weakened body fighting so many evil germies. The hot steaming soup-like kanji soothes sore throats and opens up blocked nosies.

Cherupayar
Recipe source: This is an everyday kerala dish that I learnt to perfect from my mother-in-law.

2 cups Green mung
2 tsp salt
1 medium onion
1 head of garlic (about 8 pods)
4-5 curry leaves
1/2 tsp turmeric
4 tsp crushed chilly flakes
3 tsp coconut or other vegetable oil

Method
Pressure cook the mung dal in 3 and 3/4ths cup of water to which the salt has been added.
Let it whistle 6 times ( include the ssh sounds which don't sound quite as loud as a regular whistle)
If you're not using a pressure cooker, you can simply put the beans in a large pot of water and cook until soft, but this will take longer.
Meanwhile chop the onions into long thin slices or small cubes.
Slice the garlic thinly and fry in the oil on medium heat until it turns light brown.
Now add the onions and sautee until translucent.
Now add the curry leaves, turmeric, chilly flakes and stir until the raw smell leaves and you can see that the oil has separated and is glistening on the surface of the onions.
Turn the heat down to a simmer
Add the cooked green mung and stir until well mixed.

To make the rice gruel or kanji, cook 2 cups of rice in 4 cups water until rice is soft. Reserve the water and serve a ladelful of the rice still in the water along with the green mung.
Am sending this to My Legume Love Affair hosted this month at Dil se

Basics:How to make Mung Dal/Lentil Soup the right way


We love our lentils, and to me a bowl of dal with rice is the perfect comfort food. Maybe because my mom used to pack dal and rice, with just a bit of ghee or pickle to school in my lunch box almost everyday. It is packed with protein and should be on every non-meat eaters meal plan, and is just plain delcious, in a homey non fussy way!
Dal is served in every home in every part of India and makes an appearance daily if not atleast once a week. In Kerala it is more commonly made with toor dar or split pigeon peas, though I prefer mung dal because it is easier to digest, soothing to the stomach and is considered "non-gas making" (Haha:) but mostly because mung dal takes less time to cook I think.
I have always thought that I make a pretty decent dal until I tasted my mom-in-law's dal and that totally blew me away. I had to make sure that I learnt the technique behind her perfect bowls of dal during her stay here. No garlic, no ginger, no bothersome frying of onions- the secret to her recipe is toasting the dal before cooking it. The result is a simple yet wonderfully flavorful, creamy and wholesome dish.

And of course I had to share it with you! This simple  recipe is for the beginners to Indian cooking. Dal is pretty much a staple and this delicately flavorful dish is great served as a soup on it's own, or rice. I found that it is a perfect accompaniment to my loaf of freshly baked healthy bread. So Ms just-moved-out-of-parents-home-into-new-apartment-with-roomies/husband & kitchen this is for you! Also if you like me have been making dal for years but thought there must be something missing, here's how to make dal the right way!

Dal/ Lentil soup
Recipe source: My mother-in-law

Ingredients
  • 2 cups mung dal
  • 4 green chillies
  • 1 large onion
  • 2 whole medium tomatoes (if using a pressure cooker no need to cut) or 3 tbsp tomato paste.
  • 2 tsp salt ( 1 tsp for each cup of dhal)
  • 1/2 tsp chilly powder
  • 1/2 tsp turmeric powder 
  • 1/2 tsp oil
For tempering
  • 2 dry red chillies
  • 1 tsp mustard seeds
  • 1 tsp cumin seeds
  • 4 curry leaves

Method
  • Wash the dal quickly (without soaking) and drain the mung dal for about half an hour until the water has drained out completely. 
  • Put a pressure cooker/ heavy bottom pan or saucepan  on medium heat and add the dal, stirring occasionally to toast it. 
  • (This step while it may take up an extra 10-15v mins is important and adds greatly to the flavour so skip only if you are in a hurry. You can also toast your dal ahead and store in an air tight container to save time later)
  • Lower heat to low and continue to toast the dhal until it is crisp, crunchy and a light brown colour.
  • Final test- when chewed the toasted dal should make a "krr krr" sound, indicating that it is well toasted.
  • Make sure you don't over toast. Also make sure to stir occasionally so that the dhal at the bottom does not get burnt.
  • While the dal is toasting, chop the onions finely and slit green chillies lengthwise.
  • Add the onions, green chillies, salt, chilly powder and turmeric and 1/2 tsp oil and mix well, until the masalas are well mixed with the dal.
  • Add 6-7 cups of boiling water, and the tomato paste/ tomatoes (If using a pressure cooker, no need to chop as they will explode and break into tiny pieces while the dal cooks )
  • Cover and cook until the dal is soft. ( if using a pressure cooker, just until the steam begins to build- just about 5 mins. Do not wait for a whistle else it will be overcooked and pasty)
Prepare the tempering:
  • Take a small saucepan and heat 1 tsp oil.
  • Add the mustard seeds and wait until they sputter. Turn off the heat and add the cumin seeds, curry leaves, and red chillies. 
  • Add the tempering to the cooked dal and mix well.
  • Let it simmer for about 5 mins.
This delicious bowl of simple fragrant dal is going over to Legume love affair.

    Beer Bread-No Yeast No Knead Dairy-free Egg-free Quick Bread


    I have been on a baking spree baking cakes and cupcakes and the Geek finally rebelled saying that my baking was going to give him diabetes. So I decided to turn to baking bread and have been thumbing thorough some cook books including 'Baking with Julia' and trying to decide between the 'Artisan Bread in Five Minutes a Day' method or the No-Knead Bread by Lahney. But most of these definitely simple recipes still seemed to require a bit of commitment of time and tools I didn't have, until I found this easy, almost absurdly simple and too-good-to-be-true recipe for Beer Bread.


    (Update: I have since this post gotten over my fear of yeast and made and love the Brioche bread from Artisan Bread in Five Minutes a Day. Check out my beautiful apple, cinnamon and brown sugar filled braided bread here I am now a bread fanatic!)


    Immediately bells began to ring and I ran to George the grocer's little store and asked him for one single bottle of ale- "To make bread" I explained while he looked at me puzzled.


    With the world cup quarter finals tomorrow-what could be a better snack for the football obsessed than beer bread? This is one easy and tasty bread that has the flavor of the beer and requires no yeast, no raising, kneading and all that mess.
    I added some garlic powder and oregano for some extra yuminess. The crust is crispy and the insides soft and springy as all good bread should be. Still can't get over how easy this is- Just mix, pour, bake!Can all be done in just one dish too


    Beer Bread
    Recipe source: Gerald Norman on Recipezaar from here

    Ingredients
    • 3 cups flour (sifted- make sure to sift else bread will be hard)
    • 3 teaspoons baking powder (omit if using Self-Rising Flour)
    • 1 teaspoon salt (omit if using Self-Rising Flour)
    • 1/4 cup sugar
    • 1 (12 ounce) can beer 9 recommend using either stout like Guinness or ale )
    • 1/4 cup melted butter or olive oil ( I used oil olive)
    • I also added 1 tsp garlic powder and 1 tsp oregano-optional
    Method
    • Preheat oven to 375 degrees.
    • Mix dry ingredients and beer.
    • Pour into a greased loaf pan.
    • Pour melted butter/olive oil over mixture.
    • Bake for 1 hour or until a toothpick inserted in the center comes out clean. Remove from pan and cool for at least 15 minutes. If you don't remove it and keep the bread in the pan the bottom may get soggy.
    Below are some helpful notes by Gerald : 
    This recipe makes a very hearty bread with a crunchy, buttery crust. If you prefer a softer crust (like a traditional bread) mix the butter into the batter instead of pouring it over the top.
    Sifting flour for bread recipes is a must-do. Most people just scoop the 1 cup measure in the flour canister and level it off. That compacts the flour and will turn your bread into a "hard biscuit". That's because they aren't sifting their flour! 
    If you do not have a sifter, use a spoon to spoon the flour into the 1 cup measure.
    If using non alcoholic beverages then add a packet of Dry Active Yeast or 2 teaspoons of Bread (Machine) Yeast so that you get a proper rise.
    Put a baking sheet or tray under the dish so that any butter that bubbles over doesn't spill onto the oven floor and catch fire.

    Verdict:
    Hic! The beer taste in the bread was prominent and I loved it even thought I don't even like beer! I halved the ingredients as I wasn't sure I'd like it so my bread was quite small and was all gone in seconds. Next time I will double it and make two full loves as everyone loved it and tore off chunks of this soft bread with a crunchy top.You don't have to like football or even beer to love this, whether you are making it or eating it.
    Take it along for the next tailgate party and you will be the star!